Docomoの画像認識でLineBotを行ってみる
今回は、Docomoの画像認識を使用したLineBotを作成します。
Docomoの画像認識とはカテゴリ認識、物体検出、類似画像検索、オブジェクト認識などの種類がありますが、その中のカテゴリ認識を行います。
カテゴリ認識とは、画像に写っているものが、指定されたモデルの中のどのカテゴリに属するのかを判定し、そのカテゴリの名称と判定の確からしさを表すスコアを返却するAPIです。
Docomoの画像認識
https://dev.smt.docomo.ne.jp/?p=docs.api.page&api_name=image_recognition&p_name=api_reference
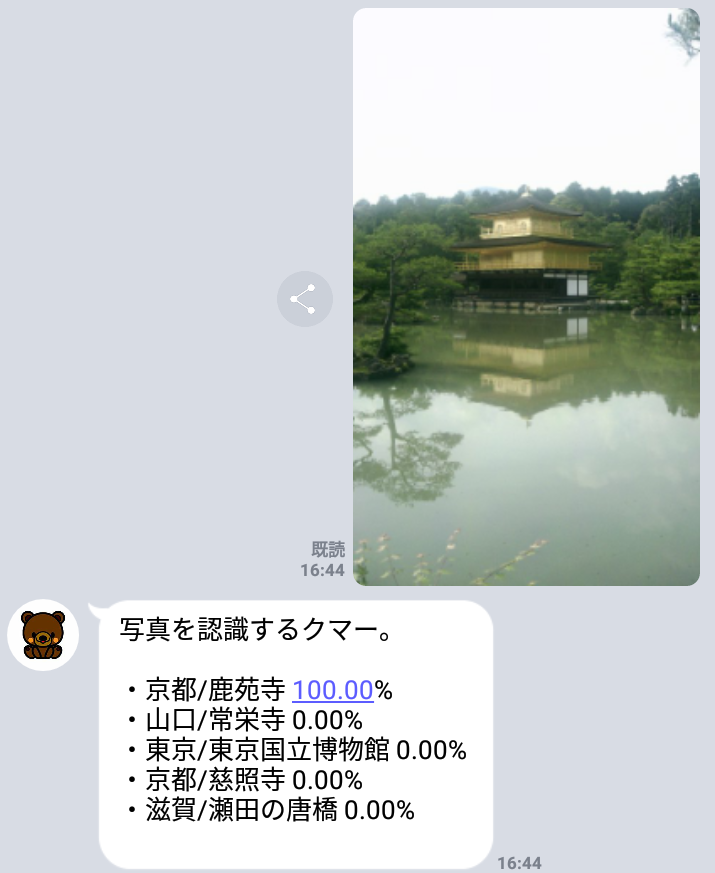
Lineと組み合わせることにより、このようなアプリケーションが簡単に作成できます。

この前旅行に行ってきた金閣寺です。正しく画像認識がされています。
というよりも目立つ建物なので正解するのは当然かも・・。
使用する環境
- Amazon AWS(EC2)
- Amazon Linux AMI 2018.03.0 (HVM), SSD Volume Type
- Flask
- Python 2.7
Python3系では存在しないライブラリを使用するので2系で作成してください。
ソースコード
|
1 2 3 4 5 6 7 8 9 10 11 12 13 14 15 16 17 18 19 20 21 22 23 24 25 26 27 28 29 30 31 32 33 34 35 36 37 38 39 40 41 42 43 44 45 46 47 48 49 50 51 52 53 54 55 56 57 58 59 60 61 62 63 64 65 66 67 68 69 70 71 72 73 74 75 76 77 78 79 80 81 82 83 84 85 86 87 88 89 90 91 92 93 94 95 96 97 98 99 100 101 102 103 104 105 106 107 108 109 |
# coding: utf-8 from flask import Flask, request import requests import json from PIL import Image from StringIO import StringIO from poster.encode import multipart_encode from poster.streaminghttp import register_openers import httplib, urllib, base64 import urllib2 #DoCoMo画像認識(カテゴリ認識)のキーを設定 DOCOMO_APIKEY = "★APIキーを設定する" DOCOMO_ENDPOINT = 'https://api.apigw.smt.docomo.ne.jp/imageRecognition/v1/concept/classify/?APIKEY=' + DOCOMO_APIKEY #LINEBotのキーを設定 LINE_API_ENDPOINT = "https://api.line.me/v2/bot/message/reply" LINE_ACCESSTOKEN = "★LINEのアクセストークンキーを設定する" header = { "Content-Type": "application/json", "Authorization": "Bearer " + LINE_ACCESSTOKEN } app = Flask(__name__) @app.route('/', methods=['POST']) def root_post(): for event in request.json['events']: if event['type'] == 'message': if event['message']['type'] == 'image': msg = getImageLine(event['message']['id']) lineReply(event, msg) print msg return '', 200, {} #指定されたメッセージで返送する def lineReply(event, message): payload = { 'replyToken': event['replyToken'], 'messages': [{ "type": "text", "text": message }] } #LineBotのエンドポイントに送信 response = requests.post( LINE_API_ENDPOINT, headers=header, data=json.dumps(payload)) #LINEから画像データを取得 def getImageLine(id): line_url = 'https://api.line.me/v2/bot/message/' + id + '/content/' # 画像の取得 result = requests.get(line_url, headers=header) # 画像の保存 i = Image.open(StringIO(result.content)) filename = '/tmp/' + id + '.jpg' i.save(filename) return SetImageCategory(filename) #DoCoMo画像認識(カテゴリ認識)を行う。 def getDocomoImageCategory(filename, modelName): register_openers() f = open(filename, 'r') datagen, headers = multipart_encode({"image": f, 'modelName': modelName}) request = urllib2.Request(DOCOMO_ENDPOINT, datagen, headers) response = urllib2.urlopen(request) res_dat = response.read() return json.loads(res_dat)['candidates'] def SetImageCategory(filename): # DoCoMo画像認識(カテゴリ認識) candidate_list = getDocomoImageCategory(filename, "landmark") msg = u"写真を認識するクマー。\n\n" # カテゴリのタグとスコアを表示 for can in candidate_list: msg += u"・" + can['tag'] + " " + str('{:.2%}'.format(can['score'])) + '\n' msg = msg.encode('utf-8') return msg if __name__ == '__main__': app.run(host='0.0.0.0') |
ソースコードの詳細
LineよりPost受信処理
|
1 2 3 4 5 6 7 8 9 10 11 12 13 14 15 |
app = Flask(__name__) @app.route('/', methods=['POST']) def root_post(): for event in request.json['events']: if event['type'] == 'message': if event['message']['type'] == 'image': msg = getImageLine(event['message']['id']) lineReply(event, msg) print msg return '', 200, {} |
テキスト・画像・スタンプの場合、event['type']はMessageとして通知されます。
Message以外は友達登録時のFollowやテンプレートメッセージに対する返信であるPostbackなどがありますが、今回は画像のみを扱うため、通知されたevent['type']がMessageかどうかを判定しています。
続いて、['message']['type']の判定を行います。画像の場合はimage、テキストの場合はtextとして通知されます。
こちらも画像かどうかを判定したいので、imageかどうかを判定しています。
このようにしてLineより画像が送られた来たメッセージが画像かどうかを判定することが出来ます。
送られた画像はLineBotの仕組み上、画像データそのものは渡されません。固有のIDのみが渡されます。
渡された固有のIDを指定して再度LINEに問い合わせることにより、画像を取得することができます。
そのための処理を別メソッド(getImageLine)として作成しています。
このメソッド(getImageLine)は固有のIDを引数に持ち、応答の文字列を戻り値として持ちます。
このメソッドで返却された文字列をそのままLineの応答として使用するため、lineReplyメソッドを起動しています。
全てが終了したら正常終了を意味する200を返却しています。
指定されたメッセージで返送する
|
1 2 3 4 5 6 7 8 9 10 11 12 13 14 |
#指定されたメッセージで返送する def lineReply(event, message): payload = { 'replyToken': event['replyToken'], 'messages': [{ "type": "text", "text": message }] } #LineBotのエンドポイントに送信 response = requests.post( LINE_API_ENDPOINT, headers=header, data=json.dumps(payload)) |
LINEから画像データを取得
|
1 2 3 4 5 6 7 8 9 10 11 12 13 14 |
#LINEから画像データを取得 def getImageLine(id): line_url = 'https://api.line.me/v2/bot/message/' + id + '/content/' # 画像の取得 result = requests.get(line_url, headers=header) # 画像の保存 i = Image.open(StringIO(result.content)) filename = '/tmp/' + id + '.jpg' i.save(filename) return SetImageCategory(filename) |
最後に、jpeg形式として保存したフルパスを指定して、DoCoMo画像認識を行い結果を整形するSetImageCategoryメソッドを起動しています。
DoCoMo画像認識を行い結果を整形する
|
1 2 3 4 5 6 7 8 9 10 11 12 13 14 15 |
#DoCoMo画像認識を行い結果を整形する def SetImageCategory(filename): # DoCoMo画像認識(カテゴリ認識) candidate_list = getDocomoImageCategory(filename, "landmark") msg = u"写真を認識するクマー。\n\n" # カテゴリのタグとスコアを表示 for can in candidate_list: msg += u"・" + can['tag'] + " " + str('{:.2%}'.format(can['score'])) + '\n' msg = msg.encode('utf-8') |
最初にgetDocomoImageCategoryメソッドを起動しています。その後、出力されたカテゴリのタグとスコアを整形して表示しています。
DoCoMo画像認識(カテゴリ認識)を行う
|
1 2 3 4 5 6 7 8 9 10 11 12 13 14 |
#DoCoMo画像認識(カテゴリ認識)を行う。 def getDocomoImageCategory(filename, modelName): register_openers() f = open(filename, 'r') datagen, headers = multipart_encode({"image": f, 'modelName': modelName}) request = urllib2.Request(DOCOMO_ENDPOINT, datagen, headers) response = urllib2.urlopen(request) res_dat = response.read() return json.loads(res_dat)['candidates'] |
今回はDocomo画像認識を行った単純なLineBotのアプリケーションですが、出力した結果に対してWikipediaから情報を持ってきて表示したり、位置情報を出力するなど、いろいろ応用することで様々なアプリケーションを作成することができます。
是非試してみてください。
参考URL
こちらのサイトを参考にさせて頂きました。
docomoの画像認識APIを用いたカテゴリ推定
https://qiita.com/ichiroex/items/16a6dcd893a131624a71