Kerasを使用してFashion MNISTの教師あり学習を試してみる
人工知能や機械学習のサンプルデータとして利用されるMNIST。MNISTは0~9の手書き数字の画像60,000枚の訓練セットと、テストセットの10,000枚を集めた画像データセットです。非常に扱いやすいため機械学習や深層学習の入門のデータセットとして使用されます。
しかし、毎回毎回MNISTを使用しても飽きてしまうのでないでしょうか?
そこで、今回は手書き数字ではなく、衣類の画像を分類するFashin_MNISTを試してみます。
![]()
Fashion MNISTはMNISTと同様に60,000枚の訓練セットと10,000枚のテストセットです。各サンプルは 28×28 グレースケール画像で、10クラスラベルと関連付けされており、この点もMNISTと同様です。
ただし、手書き数字のMNISTと異なり、シャツやバックなどファッション系のラベルとなります。
Fashion MNISTのラベルクラス
Fashion MNISTのラベルクラスは次のようになっています。
0 T-シャツ/トップ (T-shirt/top)
1 ズボン (Trouser)
2 プルオーバー (Pullover)
3 ドレス (Dress)
4 コート (Coat)
5 サンダル (Sandal)
6 シャツ (Shirt)
7 スニーカー (Sneaker)
8 バッグ (Bag)
9 アンクルブーツ (Ankle boot)
ソースコード
Kerasと必要なライブラリのインポート
|
1 2 3 4 5 6 7 8 |
#Kerasのインポート import keras import matplotlib.pyplot as plt %matplotlib inline print(keras.__version__) |
|
1 2 |
Using TensorFlow backend. 2.2.4 |
kerasのバージョンは2.2.4となっています
Fashion MNISTのダウンロード
|
1 |
(x_train, y_train), (x_test, y_test) = keras.datasets.fashion_mnist.load_data() |
|
1 2 3 4 5 6 7 8 |
Downloading data from http://fashion-mnist.s3-website.eu-central-1.amazonaws.com/train-labels-idx1-ubyte.gz 32768/29515 [=================================] - 0s 8us/step Downloading data from http://fashion-mnist.s3-website.eu-central-1.amazonaws.com/train-images-idx3-ubyte.gz 26427392/26421880 [==============================] - 4s 0us/step Downloading data from http://fashion-mnist.s3-website.eu-central-1.amazonaws.com/t10k-labels-idx1-ubyte.gz 8192/5148 [===============================================] - 0s 0us/step Downloading data from http://fashion-mnist.s3-website.eu-central-1.amazonaws.com/t10k-images-idx3-ubyte.gz 4423680/4422102 [==============================] - 2s 0us/step |
x_train・・・60,000枚の訓練セット
y_train・・・訓練セットのラベルクラス
x_test・・・10,000枚のテストセット
y_test・・・テストセットのラベルクラス
訓練セットのサイズ計算
|
1 |
x_train.shape |
|
1 |
(60000, 28, 28) |
テストセットのサイズ計算
|
1 |
x_test.shape |
|
1 |
(60000, 28, 28) |
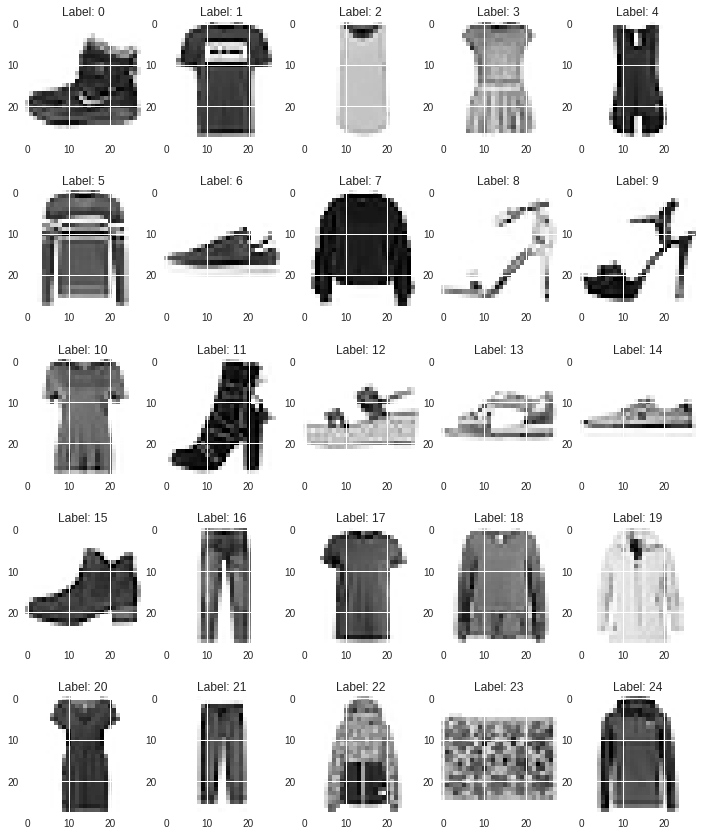
訓練用データの確認
|
1 2 3 4 5 |
plt.figure(figsize=(12,15)) for i in range(25): plt.subplot(5, 5, i+1) plt.title("Label: " + str(i)) plt.imshow(x_train[i].reshape(28,28), cmap=None) |

訓練セットのラベルクラスの確認
|
1 |
y_train[0:25] |
|
1 2 |
array([9, 0, 0, 3, 0, 2, 7, 2, 5, 5, 0, 9, 5, 5, 7, 9, 1, 0, 6, 4, 3, 1, 4, 8, 4], dtype=uint8) |
9,0,0・・・8,4となっておりアンクルブーツ,T-シャツ,T-シャツ・・・バッグ,コートとなっています。
特徴量の正規化
|
1 2 3 4 5 |
x_train = x_train.reshape((60000, 28 * 28)) x_train = x_train.astype('float32') / 255 x_test = x_test.reshape((10000, 28 * 28)) x_test = x_test.astype('float32') / 255 |
精度と損失の履歴をプロットする関数の定義
|
1 2 3 4 5 6 7 8 9 10 11 12 13 14 15 16 17 18 |
def plot_history(history): # 精度の履歴をプロット plt.plot(history.history['acc'],"o-",label="accuracy") plt.plot(history.history['val_acc'],"o-",label="val_acc") plt.title('model accuracy') plt.xlabel('epoch') plt.ylabel('accuracy') plt.legend(loc="lower right") plt.show() # 損失の履歴をプロット plt.plot(history.history['loss'],"o-",label="loss",) plt.plot(history.history['val_loss'],"o-",label="val_loss") plt.title('model loss') plt.xlabel('epoch') plt.ylabel('loss') plt.legend(loc='lower right') plt.show() |
モデルの構築
|
1 2 3 4 5 6 7 8 9 10 11 |
from keras.models import Sequential from keras.layers import Activation, Dense, Dropout from keras.optimizers import RMSprop model = keras.models.Sequential() model.add(Dense(units=512,input_dim=28*28)) model.add(Activation('relu')) model.add(Dropout(0.2)) model.add(Dense(units=10)) model.add(Activation('softmax')) model.compile(loss='sparse_categorical_crossentropy',optimizer=RMSprop(),metrics=['accuracy']) |
1行目:レイヤーの線形スタックであるSequentialモデルを適用します
2行目:中間層が512個、入力層が28*28個のニューロンを指定します
3行目:中間層の活性化関数にReLU関数を適用します
4行目:過学習の防止のために0.2の割合でドロップアウトを適用します。
4行目:出力層を10個にします
5行目:出力層の活性化関数にsoftmax関数を適用します
6行目:compileでモデルを構築します。
今回は損失関数にsparse_categorical_crossentropy、オプティマイザーにRMSpropを適用しています。
モデルの実行(教師あり学習)
|
1 2 3 4 5 |
history = model.fit(x_train, y_train, batch_size=128, epochs=50, verbose=1, validation_data=(x_test, y_test)) |
|
1 2 3 4 5 6 7 8 9 10 11 |
Train on 60000 samples, validate on 10000 samples Epoch 1/50 60000/60000 [==============================] - 4s 72us/step - loss: 0.5651 - acc: 0.7997 - val_loss: 0.4849 - val_acc: 0.8145 Epoch 2/50 60000/60000 [==============================] - 2s 40us/step - loss: 0.3945 - acc: 0.8559 - val_loss: 0.4346 - val_acc: 0.8447 省略 Epoch 49/50 60000/60000 [==============================] - 2s 40us/step - loss: 0.1523 - acc: 0.9469 - val_loss: 0.5280 - val_acc: 0.8808 Epoch 50/50 60000/60000 [==============================] - 2s 41us/step - loss: 0.1516 - acc: 0.9482 - val_loss: 0.4796 - val_acc: 0.8934 |
精度と損失の履歴をプロット表示
|
1 |
plot_history(history) |


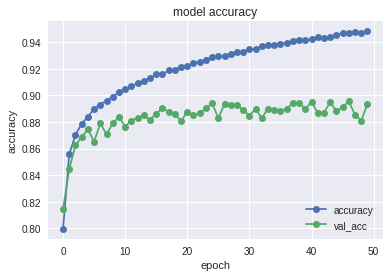
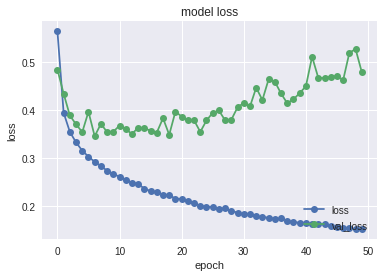
plot_historyを呼び出し精度と損失の履歴をプロットをしています。5エポックくらいから過学習が始まっているように見えます。
|
1 2 3 4 |
score = model.evaluate(x_test, y_test, verbose=1) print('loss=', score[0]) print('accuracy=', score[1]) |
|
1 2 3 4 |
10000/10000 [==============================] - 0s 49us/step loss= 0.4795634977757931 accuracy= 0.8934 |
先ほど教師あり学習を実行させたモデルで、実際のテストセットを試してみます。正解率は0.8934となっています。
混同行列の表示
|
1 2 3 4 5 6 |
import numpy as np from sklearn.metrics import confusion_matrix predict_classes = model.predict_classes(x_test) true_classes = y_test print(confusion_matrix(true_classes, predict_classes)) |
|
1 2 3 4 5 6 7 8 9 10 |
[[834 0 7 22 2 1 127 0 7 0] [ 1 981 0 14 2 0 1 0 1 0] [ 21 2 814 7 55 0 100 0 1 0] [ 18 3 11 903 32 0 29 0 4 0] [ 1 0 99 29 744 0 123 0 4 0] [ 0 0 0 0 0 965 0 21 1 13] [ 87 1 55 32 31 0 786 0 8 0] [ 0 0 0 0 0 5 0 979 0 16] [ 6 0 5 4 1 1 7 3 973 0] [ 0 0 0 0 0 4 1 40 0 955]] |
混同行列の表示(ヒートマップ)
|
1 2 3 4 5 6 7 8 9 10 11 12 13 14 15 16 |
import pandas as pd import seaborn as sn from sklearn.metrics import confusion_matrix import matplotlib.pyplot as plt def print_cmx(y_true, y_pred): labels = sorted(list(set(y_true))) cmx_data = confusion_matrix(y_true, y_pred, labels=labels) df_cmx = pd.DataFrame(cmx_data, index=labels, columns=labels) plt.figure(figsize = (12,7)) sn.heatmap(df_cmx, annot=True, fmt='g' ,square = True) plt.show() print_cmx(true_classes, predict_classes) |

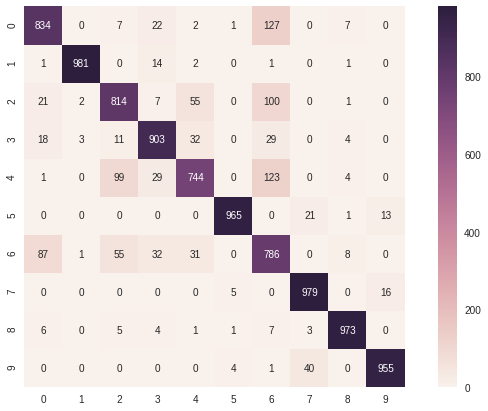
ヒートマップにするだけで見やすくなりました。
これをみると以下の特徴があります。(100件以上間違ったデータを抽出)
正解のデータ:0 間違いのデータ:6 127件
正解のデータ:2 間違いのデータ:6 100件
正解のデータ:4 間違いのデータ:6 123件
T-シャツ(0)やプルオーバー(2)、コート(4) をシャツ(6)と間違えています。姿、形が似ているので間違えが多くなるのも分かります。
以上で、今回実施したFashion MNISTの試験は終了です。まだまだ正解率が89%なので改善の余地が大いにありそうです。
普段はMNISTを利用して機械学習やディープラーニングを試している人も、気分転換にFashion MNISTを試してみてはいかがでしょうか?
参考サイト
以下のサイトを参考にさせて頂きました。
TensorFlowでFashion-MNISTを試してみた
【python】混同行列(Confusion matrix)をヒートマップにして描画
TensorFlow : Keras : 最初のニューラルネットワークを訓練する: 基本分類 (翻訳/解説)